Posts

Showing posts from September, 2015

The Perfect Digital Original

Image
Now that we have our digital negative (see  Perfect BW Scan ), we need to transform that into a Perfect Digital Original, fit for digital processing and printing. We are going to invert the negative, adjust the basic grey levels, spot re-touch the dust and hairs and sharpen the image. When all that is done, we have a good Digital Original that we can process like we would any digital image. Software I use Adobe Photoshop for this specific digital process. You will see that we need very specific tools that are not (yet) available in other products, or if they are, they do not perform exactly the way I want them to. You will be able to perform the same or similar steps in other software. I tried other applications like Phase One Capture One Pro (my preferred tool for raw processing), Affinity Photo and others. Some come close, but not close enough for me. The Process The whole process from digital negative to digital original involves a lot of
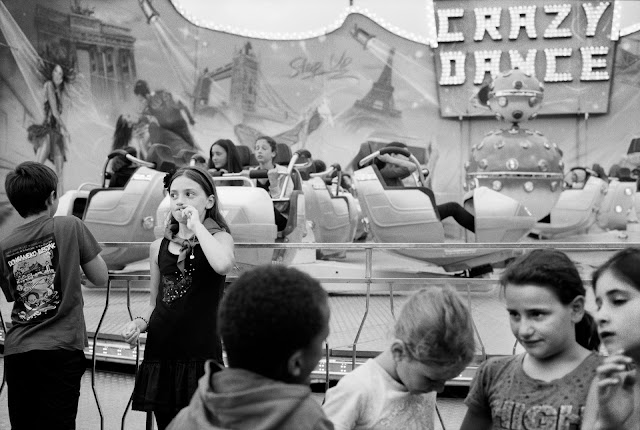
Sharpening a scanned image

Image
Sharpening is one of the key elements of a good scan. The way you introduce sharpening can make or break your image. I consider this to be the most important technical step in scanning negative. Remember that this is NOT a digital image captured by a camera sensor. This is a different process and at first it will look unfamiliar on a monitor. A film image should be judged in print, not on a monitor. Film is designed to be printed and viewed at a distance. The 35 mm negative format was actually designed around these criteria. In a digital original from film, Grain and Sharpness are linked. The more you sharpen, the more pronounced your grain. The trick is to find the exact right compromise, right for your taste, that is. Below two examples from this picture that I selected because the girl's hanger and hair are a good reference. Silver print The first one is a reflective scan from a genuine Silver print, made with a top-of-the-line Leitz Focomat-

The Perfect BW Scan

Image
I get a lot of questions on how I do things, what software I use, why I do things the way I do them. I can explain it every time, or write a generic how-to that I can refer to. I wanted to write it down for a long time now, so here we go. I work almost exclusively on black and white negative film, and I found that scanning the film, processing the digital negative and printing the digital output gives me a much better print than the traditional fully chemical silver printing process. I do make silver prints from time to time (and I did for 40 years), but only to have a base-line original that I use to check the quality of my digital prints. I know how to create a great silver print, but they don't come close to the quality of my digital prints, and let's not mention the cost of refining your silver print by printing another version every time ... But, for a good  reproducible  print you need a very well defined work-flow. It all starts with a good negative,